

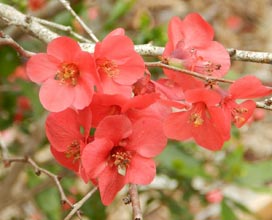
 The thunder rumbled all night and I could tell the flashes of lightening were disturbing my visiting in-laws. There was a lot of rumbling going on in the guest room also – along with a few shrieks whenever an unusually loud clap of thunder shook the house. Although the noise from the storm was loud and long, the hours and hours of rain were oh, so welcome in the garden. We really have not had any significant precipitation since the hurricane. I noticed my citrus trees are starting to bud and adequate water is essential for them at this point. Buds are swelling on the Japanese Maples also. It is unusually early to see this; I hope it is not too early. A cold snap could do considerable damage to the tender new growth.
Are you going to plant a vegetable garden this year? If so, mid February it is time to plant the peas! Sugar Snaps, Sweet green peas, Snow peas . . . they are all ready to go. Unlike most plants, peas do not mind cool soil temperatures. They actually prefer it that way, although, like most plants, they do not like cold wet soil. Good drainage is always key. You will often read about treating peas with an “inoculant” before planting. This means to dust the seeds, prior to planting, with a powder which helps the pea plant to almost magically draw nitrogen from the air. The inoculant is made from a bacterium that occurs naturally in soils. Some plants, like peas and beans, have the ability to form a relationship with this bacterium and utilize the naturally occurring airborne fertilizer. This act is known as “nitrogen fixing.” Not only does the plant obtain its own fertilizer, any additional nitrogen remains in the soil to enrich it, a win-win. You simply dampen the peas and roll them in the inoculant powder to coat them immediately before planting. Using an inoculant is not essential but why not take advantage of Mother Nature’s free fertilizer. Remember, you do not need to add additional nitrogen if using the inoculants. The bacteria works best with a neutral pH, so be sure to do a soil test when preparing your garden bed. As my colleague Laura Lee always says, “Don’t guess, do the test.” Inoculants are available at your local feed and seed stores or from online sources. Peas are vining plants and plain twigs make excellent pea fencing for them to climb on. I still have a good supply of twigs, compliments of Hurricane Matthew, and I bet you do too.
When I lived on the Eastern Shore of Maryland it was customary to cook and serve the first peas and little new potatoes of the season together. A dish of fresh spring peas and new potatoes is still a favorite of mine, and potatoes are another cool weather crop. Have you ever planted Garbage Can Potatoes? You can start with seed potatoes from the feed store or with some fresh organic potatoes from the grocery stores. Non-organic potatoes are often treated with a chemical to limit sprouting and in this case you want sprouts so go for the organic ones. Waxy “New” type potatoes work best, we don’t have the climate for Russets. You don’t need many; just a few will be plenty for this project. You want to cut the potatoes in good size, at a minimum 1″, chunks. Each chunk must contain an “eye.” Allow these pieces to dry overnight.
Now get a clean barrel or trashcan, at least 32 gallon size, and completely cut off the bottom. You can also drill a few holes in the sides for drainage and air circulation. A light colored can is best, as dark colors attract too much heat. The size of the can determines the size of your yield. Place this bottomless container directly on the garden soil in full sun and put about 6″ of good potting soil and compost in the bottom. I like to mix a good quality commercial potting soil 50/50 with homemade compost or mushroom compost, which is readily available locally. Place your potato chunks about 6″ apart on the soil and cover with 3″ of the potting soil/compost mix. If you have some worm castings this is an excellent addition. Water well. The potato sprouts will grow and when they are about 6″ to 10″ begin to add more of the soil mix, 3″ or 4″ worth, always leaving the top few set of leaves exposed. Remember to water and keep the soil slightly damp, but not too wet. Each time the plants reach 6″ to 10″ add additional soil mix until the container is full to the brim. The potatoes will form all along the stems as they grow. Your compost should take care of the fertilization requirement, but if the plants begin to look spindly some liquid fertilizer, a formula low in nitrogen, should take care of it. Allow the plants to continue to grow until they flower. At this point the exposed leaves will start to yellow and when all the leaves begin to shrivel you can harvest your potatoes. This is the fun part, you will lift your garbage can straight up (or turn it on its side and dump the soil) and gently pull the soil apart to reveal the potatoes. Nothing tastes better than freshly dug potatoes and you should get about 10 pounds for each pound you plant. The leftover soil can be spread in your garden. I doubt you will have many to keep for any length of time; they are just so good to eat. If you do want to store them be sure to allow them to dry, unwashed, in a sunny place for a few days then clean them and keep them in a cool (not the refrigerator) dry place.
Fresh peas and potatoes. Yum, I am ready, and it is always encouraging to think about spring planting in February. Lucky for me the weather has been cooperative and the vendors at the Farmers’ Market have had some outstanding winter vegetables this year.
The rain has finally stopped and I am going to get outside and spread some corn gluten. This is an organic pre-emergent weed control. Who knew a corn by-product could do that? I’ll let you know how effective it is.


