 The absolutely best organic compost you can make for your garden is worm compost. And the great part is, once you set up this odorless composting system, the worms do all the work for you. The fancy word is ‘Vermiculture’, but basically it’s just a bunch of worms in a box. Or in my case, an old claw foot bath tub left in my backyard.
By the way, you’ve got to cover any drainage holes (which you need to have to keep your worms from drowning) with a bit of screen. The whole process is really simple and will give you not only an ongoing supply of super rich compost for your garden or lawn, but also highly nutritious liquid compost ‘tea’ which you can catch from the runoff while you are waiting for the worms to do their work.
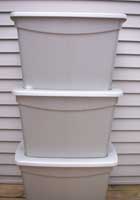
Start with a wooden box of some sort. You can make it from plywood or use an old drawer. The wood must be untreated. Or you can get several 10 gallon rubber maid containers and create a ‘tower’ system (more on that later). Or several 5 gallon plastic buckets work also.
Drill several 1/8 holes in the bottom and sides and mount off the ground on bricks.
Fill with any or all of the following: Shredded newspaper, old leaves, shredded cardboard, grass clippings (mixed in with the dry stuff to prevent clumping) and all kitchen wastes like potato peelings, vegetable leftovers and salads. Just make sure no dairy or meat or oil end up in there. You can even use the contents of your vacuum bag, old cloth, or old pillow feathers. Food wastes should always be buried to prevent fruit flies. Other things to consider are manure, straw, (especially spoiled from a stable), pruning, old plants, wood ash, bark, sawdust, and Spanish moss. No cat or dog poo, bones, mayonnaise, salad dressing, or charcoal ash, though.
Then moisten the mass until it’s like a wrung-out sponge. Since worms breathe through their skin, it must stay moist, but not too wet. That’s why your box will need a top of some sort, or tarp, to protect from too much rain. (But leave some room for oxygen to get in).
You are almost finished! Just add worms. Red Wigglers or bait worms are the best; they are short red worms with a yellowish tail and I got three cups for my worm bin at a bait shop in Port Royal. Earthworms are good for the garden too, but are not recommended for worm bins, and neither are European night crawlers, which are considered a non native species and should be avoided in case they escape into the wild where they can do damage.
All the literature suggests using 1000 worms per pound of debris to start. I started with only about 60, but I’m not under a time crunch. You can also start with just worm castings which contain many worm eggs, if you have more time to wait for them to hatch.
But if you want to really jump start your bin, here is an online source of worms – 1lb. (or about 1000) worms for just $31.00. (Much, much cheaper than what I paid per worm at the bait store ). www.orderworms.com/Red-Wigglers_c2.htm
By the way, lots of people turn these bins into successful worm farm businesses where they sell bait to fishermen and finished worm compost to home gardeners.
Back to that 10 gallon Rubbermaid tower system. You take three Rubbermaid tubs and drill holes into the bottom of two of them. Fill the bottom bin with all the ‘worm food’ described above, add worms, and wait until rich, loose, black compost is created. Then fill the second bin with fresh ‘worm food’ and place on top of the new compost created in the first bin, and wait. The worms will crawl through the holes in the new bin above in search of the new food. Then you simply lift off that bin and you have the bottom bin filled with fresh compost for your garden without any worms! And then you repeat the process with the third bin, and keep stacking for as long as you need compost.
For regular bins, you can push the compost to one side, then add new food to the other side, and just wait until the worms cross over. Or you can put a pile of fresh compost on a clean piece of paper and keep scraping off the top layer, forcing the worms to dig down deeper and deeper in the pile until there are just worms left, which are added back to the new food. I even read that you can dump the entire bin on a sheet ,and that your kids and their friends will just love picking out the worms from that pile of compost (but personally the idea of this makes my skin crawl! Yuck!!)
On average, ‘vermicast’ – or worm poo – contains five times more nitrogen, seven times more phosphorous, and eleven times more potassium than normal compost and plants simply love it – both indoor and outdoor’– according to the book Composting by Victoria Heyward. There is also another very good book on worm composting called Worms Eat My Garbage: How to Set up & Maintain a Worm Composting System.
Another benefit of adding worm compost to your garden is that you’re adding worm eggs along with it. When they hatch, they will start the process of taking leaves and debris from the surface and storing them down below the soil in ‘pockets’ near the plant roots where they break down and provide a natural source of nitrogen for your plants. The channels they dig also create paths for water and air to reach the roots.
Without your having to break your back with a hoe or spend money on expensive fertilizer, the worms will do all the work for you! I hope you have enjoyed this short trip into the wonderful world of worms. There’s a lot of more detailed info on the internet if you decide to take a skip down this easy path to a rich source of compost for your garden. Your plants will thank you for it!

